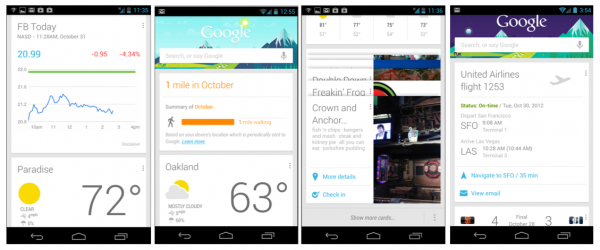
Source: https://github.com/neelkrishna/recyclerViewDemo
Upon the Release of Android 5.0 in 2014, ListFragment was deprecated, and while it can still be used in development of Android apps, it is a pain to work with. Google decided to replace ListFragment with a more robust, if harder to implement, Widget called RecyclerView. The widget sits directly within a Layout Container (no fragment is necessary).
RecyclerView uses an Adapter, which passes List items to it. The adapter returns an object of the type of List Item you choose to pass to the RecyclerView. In this post, you will learn how to implement RecyclerView in your app, and how to pass CardView objects to scroll through them.

Google Now is an example of an app using RecyclerView and CardView. Each object in the list is a “Card” and can be a different size or format than other cards. This is the advantage of using RecyclerView over ListFragment.
The first thing you need to do is add these dependencies to your gradle build file (with the rest of the compile dependencies):
1 2 |
compile 'com.android.support:cardview-v7:21.0.+' compile 'com.android.support:recyclerview-v7:21.0.+' |
Next we will create a CardView. In our example here, every Card will be of the same format. To create an app with multiple types of Cards (like Google Now), create multiple CardView layouts, and pass them through the same adapter to one RecyclerView.
CardView is a ViewGroup widget, and is added to your app using a layout XML file. You can call this file card_view_layout.xml. Let’s place the CardView in a LinearLayout with an ImageView and a TextView (a basic example, but you can easily add to your CardView layout once you understand how to use it).
1 2 3 4 5 6 7 8 9 10 11 12 13 14 15 16 17 18 19 20 21 22 23 24 25 26 27 28 29 30 31 32 33 34 35 36 37 38 39 40 41 |
<?xml version="1.0" encoding="utf-8"?> <LinearLayout xmlns:android="http://schemas.android.com/apk/res/android" android:layout_width="match_parent" android:layout_height="match_parent" android:padding="16dp" > <android.support.v7.widget.CardView android:layout_width="match_parent" android:layout_height="wrap_content" android:id="@+id/cardview" > <RelativeLayout android:layout_width="match_parent" android:layout_height="wrap_content" android:padding="16dp" > <ImageView android:layout_width="wrap_content" android:layout_height="wrap_content" android:id="@+id/photo" android:layout_alignParentLeft="true" android:layout_alignParentTop="true" android:layout_marginRight="16dp" /> <TextView android:layout_width="wrap_content" android:layout_height="wrap_content" android:id="@+id/title" android:layout_toRightOf="@+id/photo" android:layout_alignParentTop="true" android:textSize="30sp" /> </RelativeLayout> </android.support.v7.widget.CardView> </LinearLayout> |
Next, we will build our RecyclerView. Again, a RecyclerView is a View Widget, so we define it in a new Layout XML file. You can call this “view_recycler” and define it as follows:
1 2 3 4 5 |
<android.support.v7.widget.RecyclerView android:layout_width="match_parent" android:layout_height="match_parent" android:id="@+id/recyclerview" /> |
To use a RecyclerView in your Activity or Fragment, you need to use a LayoutManager. You can either define a LayoutManager by extending RecyclerView.LayoutManager, or you can use one of the predefined LayoutManager subclasses (LinearLayoutManager, GridLayoutManager, or StaggeredGridLayoutManager). Let us use LinearLayoutManager to create a list of Cards.
1 2 3 |
RecyclerView recycler = (RecyclerView)findViewById(R.id.recyclerview); LinearLayoutManager layoutManager = new LinearLayoutManager(context); recycler.setLayoutManager(layoutManager); |
For the sake of this tutorial, let us assume you have created an Object called Book. Each Book has a cover (a photo) and a title (a String). Now we have to create an adapter for our RecyclerView. Recall that an adapter passes items (in our case CardView objects) to our RecyclerView. Let’s create a new class, BookAdapter:
1 2 3 4 5 6 7 8 9 10 11 12 13 14 15 16 |
public class BookAdapter extends RecyclerView.Adapter<BookAdapter.BookViewHolder>{ public static class BookViewHolder extends RecyclerView.ViewHolder { CardView cv; TextView title; ImageView cover; BookViewHolder(View itemView) { super(itemView); cv = (CardView)itemView.findViewById(R.id.cardview); title = (TextView)itemView.findViewById(R.id.title); cover = (ImageView)itemView.findViewById(R.id.photo); } } } |
Next, we add our constructor for our RecyclerView Adapter:
1 2 3 4 5 |
List<Book> books;

BookAdapter(List<Book> books){
    this.books = books;
}
|
Finally, there are four methods we are required to override:
1 2 3 4 5 6 7 8 9 10 11 12 13 14 15 16 17 18 19 20 21 22 23 |
@Override public int getItemCount() { return books.size(); } @Override public BookViewHolder onCreateViewHolder(ViewGroup viewGroup, int i) { View v = LayoutInflater.from(viewGroup.getContext()).inflate(R.layout.item, viewGroup, false); BookViewHolder bvh = new BookViewHolder(v); return bvh; } @Override public void onBindViewHolder(BookViewHolder bookViewHolder, int i) { bookViewHolder.title.setText(books.get(i).title); bookViewHolder.cover.setImageResource(books.get(i).photoId); } @Override public void onAttachedToRecyclerView(RecyclerView recyclerView) { super.onAttachedToRecyclerView(recyclerView); } |
And there you have it. Once you compile and run this application (with initialized data), you should see a RecyclerView with a series of scrollable CardView items to get you started!
If you need help initializing data for your specific app, or have any other questions, drop me a line!